iTunes 10 and Windows 7: We’re Back (stupid fixable problems)
In an earlier randosity article, I discuss permissions issues related to iTunes 8. We’ll, these issues have now returned with a vengeance in iTunes 10. Does Apple not actually test their software on Windows? I mean, seriously, it’s not that hard to fix this issue when installing.
Apple’s weak Windows developers
Clearly, Apple only focuses on Apple. When it comes to Windows, they just vomit out the software without thought to what crap it really is. Come on Apple, fix your crap. I’m tired of dealing with these issues that are so easily resolved.
How can Apple permanently fix this problem? Simple, the iTunes installer needs to uninstall iTunes fully and clean up all iTunes registry entries completely. Then, the installer should reinstall iTunes from a clean setup. Apple should NOT do the install-over-whats-existing-thing and hope it all works. This clearly doesn’t work.
Anyway…
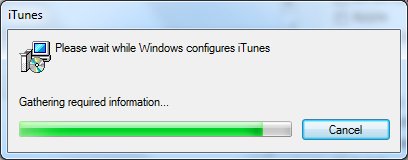
If you are an iTunes 10 user and you continually keep seeing THIS WINDOW when launching iTunes:
… and that says “Please wait while Windows configures iTunes” …
Then, follow these instructions in my earlier randosity article to fix the registry permissions for iTunes.
Ok, so the earlier fix doesn’t work. But, you can read the article as it has some relevant information about what causes the issue. Anyway, this word doc attached contains the commands necessary to reset the registry permissions on iTunes and QuickTime registry keys.
Note, since WordPress doesn’t allow attaching functioning scripts as part of the media, I have created this Word doc with the commands. You will need to use the following steps to create the script. Note you will need to quit out of iTunes before you run this command.
Steps to create the reset.cmd command from resetit.doc:
- Save the ResetIt.doc file to your hard drive
- Open it with MSOffice or OpenOffice
- Press ctrl-a to select everything in the doc, ctrl-c to copy it
- Launch Notepad (Start->All Programs->Accessories->Notepad or Windows Button->All Programs->Accessories->Notepad)
- In the Notepad window, press ctrl-v to paste
- In Notepad, File->Save As… and save the file as Reset.cmd in a location you can easily find*
- Launch a command prompt with Start->All Programs->Accessories->Command Prompt using right-click selecting ‘Run As Administrator’
- In the command prompt, cd to where you saved Reset.cmd
- Type in ‘reset.cmd’ into the command shell
Note that this script will take a few minutes to run. Once the script completes, try starting iTunes. If you no longer get this panel, it’s fixed. If you do, then you may need to run this reset script 2 or 3 times more to fully repair the permissions. The reason is that subinacl (the command that’s used to reset each key in the registry) doesn’t continue locating more keys and repairing them once an error occurs (even when it’s successful at changing things). Make sure your login account in Windows 7 is an administrator account.
I have found that the permissions were relatively easy to fix, but the difficulty is with Microsoft’s subinacl.exe command. This command doesn’t seem to work properly to drill down to keys below. This is why you will see lots of duplication in the script. The script needs to run the command multiple times to drill down and get all of the keys. This is also why you may need to run the script several times. If you find you don’t have subinacl.exe, you will need to download subinacl.exe from Microsoft.
Second Note, uninstallation of iTunes and reinstallation may not resolve this issue as the registry keys may not be deleted on uninstallation (due to permissions problems). Therefore, uninstalling and reinstalling probably won’t work. Even still, the new keys may install with the crap permissions that the existing ones already have and you’ll be right back in the same boat. The fix is to make the keys readable and writable by the current user and the administrator.
Come on Apple, fix your crap software.
*Make sure that notepad saves the file as reset.cmd and not reset.cmd.txt. To do this, in the Save As requester, make sure to type in only reset.cmd. Double check to make sure it didn’t append the .txt extension. If it does, you will need to rename this file and remove the .txt portion to run the script.
Disclaimer: The script described above modifies registry keys and is used at your own risk. These keys have been checked against what Apple uses, but following the steps above and modifying the registry is not without risk. Therefore, each user who follows these instructions assumes all risk when creating and running the above reset.cmd script.


Thank you soooo much! Worked great! Crazy how there seems to be little alternative to this!
LikeLike
Awesome! I’m glad this fixed your issues. :)
LikeLike
This is a website that might help:
http://HowToUninstalliTunes.com
LikeLike
Note that my fix doesn’t require uninstallation. The instructions on the web site you suggest are fairly in-depth. My fix requires you to create and execute a small script without the need to uninstall. Note that even uninstallation may not resolve this issue. The registry key permissions causing this issue may simply be replaced immediately by reinstalling iTunes leading you right back here for the fix. So, you could find yourself going through that laborious uninstall process only to end up right back here. Or, you could save that time and run my script that fixes the registry key permissions and fix it once.
Thanks.
LikeLike